 |
Art Fiber Tassel Earrings
|
You will need the following materials:
Embroidery floss - any color
1 - A big-eye needle
2 - Earwires
2 - Eyepin
6 - Jump rings
2 - Bead caps
8-12 - Indian Bells
1x1.5" piece of cardboard
Scissors
Flat nose and round nose pliers
Jewelry wire cutters

Hold the free end of the embroidery floss under your thumb on top of the cardboard card, with a small 1 to 1.5" tag of embroidery floss hanging off the card.
Wind the embroidery floss around the card 8 to 10 times, so that you end up with an even amount of loops on the bottom of the card.
The tag of embroidery floss and the longer length attached to the skein will end on top of the card if this is done correctly.
Slowly, pull the card out of the loops so that you have something that looks like this.
Do not cut off the longer length. We will need it to stay attached for a few more minutes.
Pinch the loops in between your forefinger and thumb so that the top 1/4" of the tassel is sticking out (along with the two pieces of floss).
Grab the longer piece of floss, and tightly wrap around the top of the tassel so that is it completely covered.
Now you can cut off the longer length of floss, leaving 1 foot.
Thread the 1 foot length of floss onto the big eye needle and carefully pass it up in between the loops (through the middle) of the bottom of the area you just wrapped.
Pass the big eye needle back through to the top of the tassel so that the tassel, once again, has both pieces of the floss coming out of it.
Now, you want to knot both pieces of floss to each other carefully (as as to not pull length from the loops).
After making your knot, you may cut off both pieces of extra floss.
You now have a tassel. Now, make another tassel. After you have two tassels, you can begin assembling the earrings.
Earring Assembly:
Pick up one tassel, split the loops apart evenly and carefully pass the eyepin up through the bottom of the tassel so that the top of the eyepin exits the top of the tassel (leaving the eye of the pin in between the loops and under the head of the tassel). If yours' looks like mine, you've done it right!
Now, put the bead cap on top of the tassel so that it covers the head of the tassel, like so....
We are making a wrapped loop on top of the tassel. This will hold the tassel together with the bead cap and provide places to attach our ear wire and charms! Yeah!
Pick up the flat nose pliers and make a right angle bend right above bead cap. Put your flat nose pliers down and pick up the round nose plier. Place the round nose plier next to the right angle bend and gently pull the long piece of wire around the top round nose.
You need to reposition the pliers (see photo) so that the wire passes through the middle of the plier jaws.
Once you have repositioned, gently pull the long piece of wire down around the bottom jaw of the round nose pliers.
When you pull the pliers off, you will have a loop! Well, if you've done it right. No worries, you can contact me or google "wrapped loop how to" and get more specific directions.
Position the loop in between jaw of your round nose pliers and wrap the end of the wire around its base 2 times. Cut off any excess wire you may have and gently push the end into its base with your flat nose pliers.
All we do now is open jumps rings and attach bells. Jump rings are meant to be pulled open front to back, not side to side.
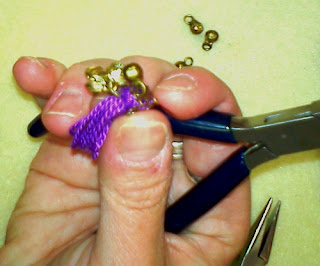
I put 2 to 3 bells on a jump ring, hooked the edge of the filigree bead cap, and gently close the jump ring. Do this once or twice around the cap, or on either side of the cap, depending on how many bells you would like on your earring.
Your final steps!
Open the loop on your earwire, hook the loop on top of the tassel and close your earwire loop. The earwire should now be attached to the tassel.
As you can see, we have our bells on the cap already and your only other step is to cut the bottom of the tassel loops with scissors. If they don't cut evenly, no worries! Gently, trim the longer strands and even it all up.
Enjoy!


No comments:
Post a Comment