

 K.I.S.S.
Ever
feel like a project just isn't worth doing unless it takes 40 hours -
endless cursing - and techniques so complex they don't make sense
anymore?! If you've just started beading....Beware! The monster of
complexity looms on the horizon.
I've
been teaching beading - all manners of - for over 12 years now and I
know this scenario well. It begins simply enough: you've been taught
how to do something simple by your beloved local bead store (because if
you're shopping at a big box store - shame on you), and off you go
tra-la-la-ing merrily learning to bead! This is good for the next few
months. Year. Maybe two years. Then, all of a sudden, it's not
enough!!
What?
Wait, a minute. What just happened?! I'll tell you what happened.
You've mastered the basics and moved on. Then, LOW AND BEHOLD you've
gotten addicted to your new hobby....and, yep, beads do that! They have
this way of insidiously seeping into our every waking (and no so
wakeful) thoughts forcing us to devise new ways to use them.
All
of us old timers will tell you that that addiction is tough to put
away. That addiction leads us in to ever-evolving and complex beading
projects because our minds are fascinated with the act of beading. At
this point, resistance is futile! Those one hour projects have,
hopelessly, turned into 3, 4, 10, 40 hour projects. 40 hours?!!
You
know what?! You can't readily sell a project what has taken 40 hours
to create. It's your baby, you sure you want to sell it anyway? Trust
me when I say, the higher the price point, the longer it takes to sell.
And, I'm here to remind you of one more thing.....Keep It Simple
Stupid!
Why,
you ask, should I back track now just when I've hit my stride?! Well, a
couple of things. To remind you that (1) simple sells, and (2) simple
cleans and refreshes your mind. Like sleep clears your thoughts, so
will doing a simple project from time to time. It allows your mind to
relax. With that thought in mind, let's play with our beads!
Recently,
I played with some pearls - well mostly because my mom came to me with a
friend's repair which involved some pearls - but, I had them out and I
thought: "God, I love pearls!" So, here is something simple to consider
and maybe create - just for you from me.
Why not, right?!

The Simple Pearl Project
Supplies:
11 - 8mm Freshwater Pearls
13-15 Inches - 3mm SP Curb Chain
10 - 4mm SP Jump Rings
5 - 5mm SP Jump Rings
7 - 1.5" GP Bead Tip Headpin
15 - 3mm GP Faceted Nuggets
1 - 9mm SP Lobster Claw
1 pair of SP French Ear wires
1 - 8" piece of 22 g SP wire
1 Tiny Cute Charm

Prepare the components before assembling:
1. Cut 4 - 2" pieces of chain
2. Cut 2 - 2.75" pieces of chain
3. Cut 1 - 1/2" piece of chain
4. Headpin 7 pearls with a gold nugget and top loop onto a GP bead tip headpin (charmed pearls)
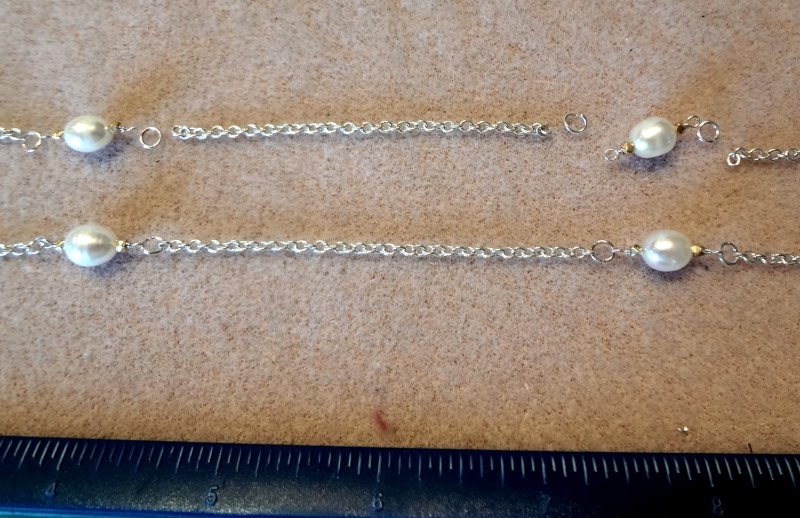
5. Wire 4 pearls with gold nuggets and loops on either side onto the 22g SP wire (double looped pearls)
6. Lay out your components in the order they will be assembled on a bead pad.

Assembling the Necklace:
7.
Open the top loops on the charmed pearls and ring them onto the 1/2"
length of chain (see left) in the pattern you see: one pearl on the end
and two each on the next link up, skip a link, then again on the next
link up
8. With a 5mm jump ring, ring the cluster of pearls to two lengths of 2" chain

9. With 4mm jump rings, ring a double-looped pearl onto the end of each of the 2" pieces of chain
10. With a 4mm jump ring, ring a length of 2.75" chain to the end of each double looped pearl (see left)
11.
In this order finish the chain as follows: jump ring the last two
double looped pearls to the 2.75" chain, then jump ring the last two 2"
lengths of chain to those pearls.
12. Finish the necklace with a 5mm jump ring on one side and a 4mm jump ring and the lobster claw on the other.
13. Add the tiny cute charm next to the lobster claw


Earring Assembly:
1. With a 5mm jump ring, ring a charmed pearl to the french ear wire. Voila!
You should have a nice pearl necklace and earring set! Yay!
Now, go outside and play with your kids.
Happy Beading!!
Wanting to know more? You can get more detailed directions and full color photos of my projects at my Etsy store - Dragonfly Beads Studio - as a downloadable PDF.
You can also get all or most of the supplies you see in my projects from me at my Etsy Store - Dragonfly Beads Studio - or like me on Facebook at Dragonfly Beads!! You can send me messages on either link for supplies you can't find online - the findings, wire, clasping, gemstone, pearls, seed beads - I carry it all! Just ask!